
A gate of silence waits ahead,
no key, no plea, no hurried tread—
but speak the truth, the name you own,
and paths once barred become your own.
A gate of silence waits ahead,
no key, no plea, no hurried tread— but speak the truth, the name you own, and paths once barred become your own.
OpenID Connect becomes confusing when it is described as a list of endpoints and tokens. The easier way to understand it is as a conversation between three parties:
- the browser, which carries the user between services;
- the application backend, which wants to know who the user is;
- Authelia, which authenticates the user and can prove the result.
The application never receives the user’s password. It sends the browser to Authelia, Authelia performs the login, and the application receives a signed statement about the resulting identity. The application verifies that statement and then creates its own session.
This distinction is the heart of the entire flow:
Authelia authenticates the user. The application decides what that user may do.
OpenID Connect (OIDC) is an identity layer built on OAuth 2.0. OAuth is mainly concerned with delegated access to resources. OIDC adds the openid scope and an ID token, giving the client a standard way to verify an authentication event and identify the user.
In this guide, Authelia is the OpenID Provider (OP), and a Node/Express backend is the Relying Party (RP), also called the client. Google, Microsoft Entra, and other providers follow the same protocol shape, but their registration settings and available claims differ.
The Mental Model
Before looking at code, it helps to give each participant one job.
| Participant | OIDC name | Responsibility |
|---|---|---|
| Browser | User agent | Carries redirects, the authorization code, and the application session cookie. |
| Application backend | Relying Party / client | Starts login, keeps one-time values and the client secret, validates the result, then creates a local session. |
| Authelia | OpenID Provider | Authenticates the user, asks for consent when configured, and issues tokens. |
| Session store | Application component | Stores the pending login transaction and, after login, the application’s user session. |
The frontend is not handling tokens in this example. The browser follows redirects, but the backend is the OIDC client. That is why the backend can safely hold a client secret and why the token exchange happens server-to-server.
Trust Is Configured Before Login
OIDC does not start with a random application asking Authelia to identify someone. A trust relationship is registered first:
- Authelia knows the application’s client ID.
- Authelia stores a hash of the client secret.
- The application stores the original client secret.
- Authelia allowlists the exact callback URI.
- Both sides agree on the issuer, scopes, response type, PKCE, and token-endpoint authentication method.
This registration is what lets Authelia reject an unknown client or an unexpected callback destination before a user is sent anywhere unsafe.
The Authorization Code Flow
This guide uses the Authorization Code flow with PKCE. The browser receives only a short-lived, one-time authorization code. The tokens are returned later over a direct HTTPS connection between the application and Authelia.
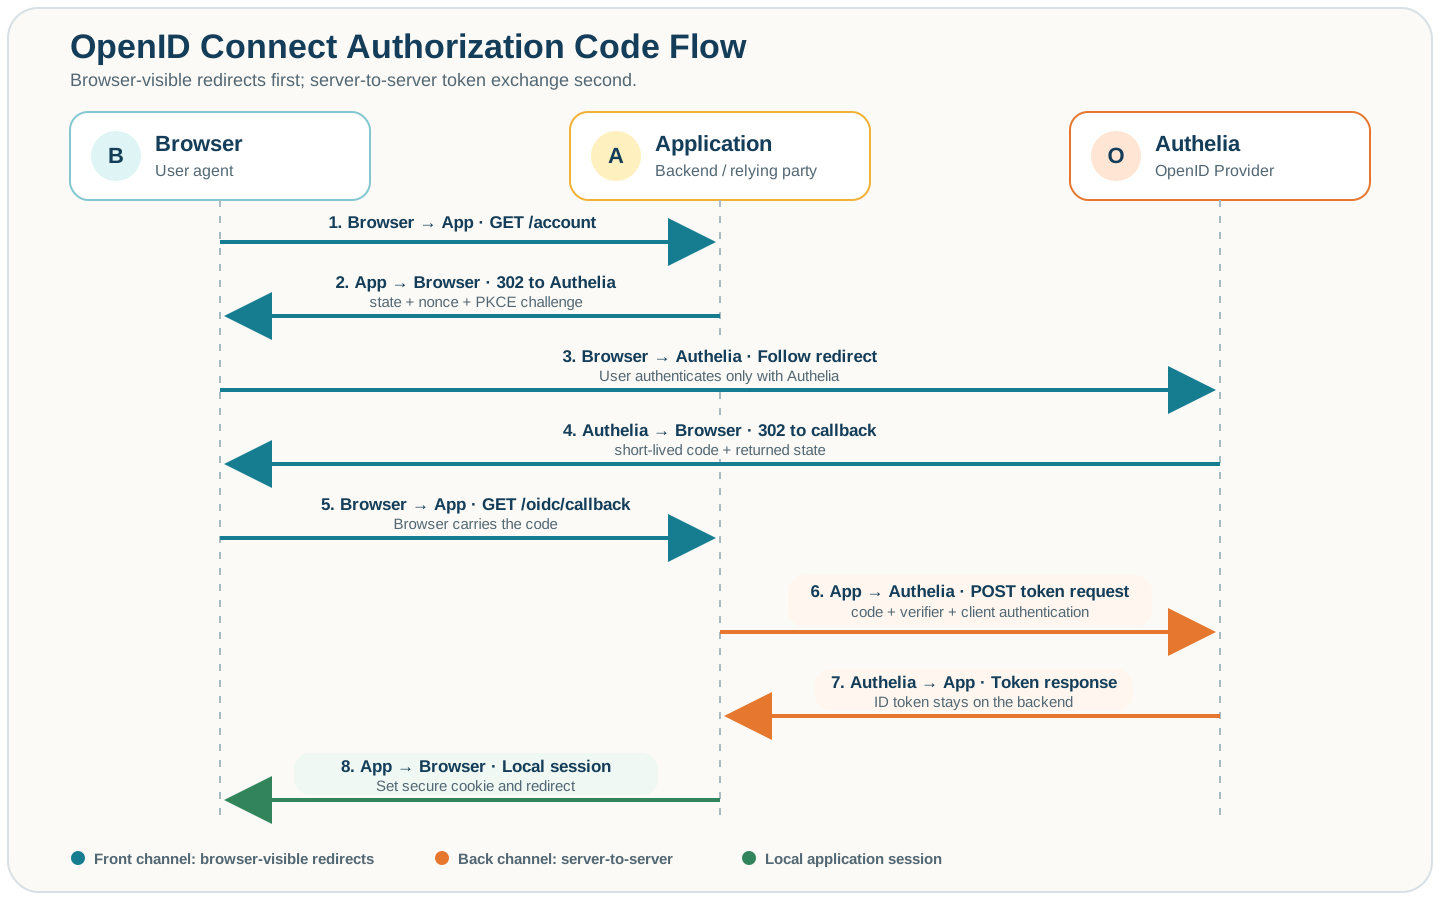
The browser carries redirects on the front channel. The application exchanges the code for tokens on the back channel.
1. The User Requests a Protected Page
The browser asks the application for something such as /account. The backend checks its own session store and finds no logged-in user.
At this point, the application does not ask Authelia, “Is this request allowed?” Instead, it starts a new authentication transaction. In the club analogy, the bouncer sees no entry stamp and directs the visitor to the registration desk.
2. The Application Creates One-Time Values
Before redirecting the browser, the backend generates three values:
statebinds the callback to the login attempt that started it and protects the authorization response from cross-site request forgery.noncebinds the ID token to this authentication request and helps prevent token replay.- PKCE
code_verifieris a secret created for this one attempt. Its derivedcode_challengeis sent to Authelia, while the verifier remains in the application’s session.
The backend stores state, nonce, and code_verifier in the pending server-side session. It sends the browser an authorization URL containing the client ID, callback URI, requested scopes, state, nonce, and the PKCE challenge.
These are transaction values, not long-lived configuration. Generate new ones for every login and consume them only once.
3. The Browser Visits Authelia
The application replies with an HTTP redirect, and the browser follows it to Authelia. The user’s credentials and second factor are entered there. They never pass through the application.
Authelia now knows two separate things:
- which user authenticated;
- which registered client asked for that authentication.
If the request is valid and the configured policy is satisfied, Authelia creates a short-lived authorization code.
4. Authelia Returns an Authorization Code
Authelia redirects the browser to the exact registered callback URI:
https://app.example.com/oidc/callback?code=abc123&state=...
The code is not the user’s identity, and simply decoding or storing it would achieve nothing. It is a one-time credential that the application must redeem at Authelia’s token endpoint.
The browser can see this code because it carries the redirect. That is safe only because the code is short-lived, single-use, tied to the callback URI, and—in this flow—bound to the application’s PKCE verifier.
5. The Backend Exchanges the Code
The backend first compares the returned state with the value saved in the session. It then makes a direct HTTPS request to Authelia’s token endpoint containing:
- the authorization code;
- the exact same callback URI;
- the private PKCE
code_verifier; - the client ID and client authentication.
Authelia checks that the code is valid, unused, issued to this client, and paired with the correct verifier. Only then does it return an ID token and an access token to the backend.
The browser is not involved in this exchange. The client secret, PKCE verifier, ID token, and access token therefore do not need to enter browser storage.
6. The Application Validates the Result
Receiving a JWT is not enough. The client must validate it. A maintained OIDC library performs the protocol checks using Authelia’s discovery metadata and published JSON Web Key Set (JWKS), including:
- the signature and signing key;
- the exact issuer (
iss); - the intended audience (
aud); - expiry (
exp); - the expected nonce;
- the authorization response state and PKCE binding.
The important identity claim is sub, the subject identifier. Within an issuer, it is the stable identifier intended for linking an OIDC identity to a local account. Email addresses and display names can change.
7. The Application Creates Its Own Session
Once validation succeeds, OIDC has done its job. The application takes the verified issuer, subject, and any claims it deliberately uses, then stores them in its own server-side session.
The browser receives an opaque application session cookie. On later requests, the backend checks that local session instead of repeating the full OIDC flow.
There are now two sessions:
- an Authelia session, which enables single sign-on across clients;
- an application session, which represents login to this one application.
That separation explains why logging out of the application does not necessarily log the user out of Authelia.
What Each Value Is For
| Value | Purpose | Where it should live |
|---|---|---|
| Authorization code | One-time input to the token exchange; not proof of identity by itself. | Briefly visible in the browser callback, then consumed by the backend. |
| ID token | Signed claims about the authentication event and user, intended for this client. | Validated and retained only on the backend when needed. |
| Access token | Authorizes calls to a protected resource or UserInfo endpoint. It is not the application’s session cookie. | Backend only in this example. |
state | Binds the authorization response to the login attempt. | Server-side pending session; echoed through the browser. |
nonce | Binds the ID token to the authentication request. | Server-side pending session; included in the authorization request and ID token. |
| PKCE verifier | Proves that the client redeeming the code started the flow. | Server-side pending session only. |
| Application session cookie | Identifies the application’s local session after OIDC completes. | Browser cookie, with the session data stored server-side. |
Register the Client in Authelia
The example assumes:
| Setting | Value |
|---|---|
| Authelia issuer | https://auth.example.com |
| Application | https://app.example.com |
| Callback URI | https://app.example.com/oidc/callback |
| Client type | Confidential |
| Flow | Authorization Code with PKCE S256 |
| Token authentication | client_secret_basic |
Authelia’s provider-level OIDC configuration and signing key must already exist. This section adds the registered client.
Generate the Client ID and Secret
Authelia can generate a random client ID:
authelia crypto rand --length 72 --charset rfc3986
It can also generate a random raw secret and its PBKDF2 hash:
authelia crypto hash generate pbkdf2 \
  --variant sha512 \
  --random \
  --random.length 72 \
  --random.charset rfc3986
The two secret forms have different destinations:
- put the hash in Authelia’s
client_secretsetting; - put the raw secret in the application’s
OIDC_CLIENT_SECRETenvironment variable.
Do not put the hash in both places. Authelia compares the raw secret presented by the application with the stored hash.
Add the Client
identity_providers:
  oidc:
    # Provider signing keys and other mandatory provider settings go here.
    clients:
      - client_id: 'replace-with-the-generated-client-id'
        client_name: 'My Application'
        client_secret: '$pbkdf2-sha512$...'
        public: false
        authorization_policy: 'two_factor'
        require_pkce: true
        pkce_challenge_method: 'S256'
        redirect_uris:
          - 'https://app.example.com/oidc/callback'
        scopes:
          - 'openid'
          - 'profile'
          - 'email'
        response_types:
          - 'code'
        grant_types:
          - 'authorization_code'
        token_endpoint_auth_method: 'client_secret_basic'
The callback URI is an exact, case-sensitive allowlist entry. Scheme, hostname, port, path, and trailing slash must match what the application sends.
The token_endpoint_auth_method is also important. Authelia defaults confidential clients to client_secret_basic. The JavaScript client will be configured explicitly to use the same method.
The current options and defaults are documented in Authelia’s client configuration reference. Its OIDC FAQ explains client-secret generation and the distinction between the raw secret and stored hash.
Build the Node/Express Client
This example targets Node.js 20 or newer and openid-client 6.8.7 or newer within the 6.x release line. It uses a confidential backend client, a persistent SQLite session store, and ESM imports.
Install the Dependencies
npm install openid-client@^6.8.7 express express-session connect-sqlite3
Express’s default MemoryStore is for development only. Use a persistent store appropriate to the deployment, such as Redis, a database-backed store, or the SQLite store shown here.
Configure the Environment
OIDC_ISSUER=https://auth.example.com
OIDC_CLIENT_ID=replace-with-the-generated-client-id
OIDC_CLIENT_SECRET=replace-with-the-raw-client-secret
OIDC_REDIRECT_URI=https://app.example.com/oidc/callback
SESSION_SECRET=replace-with-a-separate-long-random-secret
Use the issuer root URL, not a manually copied authorization or token endpoint. Discovery obtains the correct endpoints and key metadata from:
https://auth.example.com/.well-known/openid-configuration
Discover Authelia and Configure Sessions
import express from "express";
import session from "express-session";
import connectSqlite3 from "connect-sqlite3";
import * as oidc from "openid-client";

const {
  OIDC_ISSUER,
  OIDC_CLIENT_ID,
  OIDC_CLIENT_SECRET,
  OIDC_REDIRECT_URI,
  SESSION_SECRET,
} = process.env;

if (
  !OIDC_ISSUER ||
  !OIDC_CLIENT_ID ||
  !OIDC_CLIENT_SECRET ||
  !OIDC_REDIRECT_URI ||
  !SESSION_SECRET
) {
  throw new Error("Missing required OIDC or session environment variable");
}

const app = express();

// Use the correct value for your proxy topology. Do not blindly trust all proxies.
app.set("trust proxy", 1);

const issuer = new URL(OIDC_ISSUER);
const redirectUri = new URL(OIDC_REDIRECT_URI).href;

const config = await oidc.discovery(
  issuer,
  OIDC_CLIENT_ID,
  { client_secret: OIDC_CLIENT_SECRET },
  oidc.ClientSecretBasic(OIDC_CLIENT_SECRET),
);

const SQLiteStore = connectSqlite3(session);
const sessionStore = new SQLiteStore({
  db: "sessions.sqlite",
  dir: "/var/lib/my-app",
});

app.use(session({
  name: "app_session",
  secret: SESSION_SECRET,
  resave: false,
  saveUninitialized: false,
  store: sessionStore,
  cookie: {
    httpOnly: true,
    secure: true,
    sameSite: "lax",
    maxAge: 8 * 60 * 60 * 1000,
  },
}));
Passing Authelia’s issuer to discovery() avoids hard-coding its authorization, token, and JWKS endpoints. The explicit ClientSecretBasic call matches the Authelia client registration; current openid-client otherwise defaults discovery-created clients to client_secret_post.
Start Login
app.get("/login", async (req, res, next) => {
  try {
    const codeVerifier = oidc.randomPKCECodeVerifier();
    const codeChallenge =
      await oidc.calculatePKCECodeChallenge(codeVerifier);
    const state = oidc.randomState();
    const nonce = oidc.randomNonce();

    req.session.oidc = { codeVerifier, state, nonce };

    const authorizationUrl = oidc.buildAuthorizationUrl(config, {
      redirect_uri: redirectUri,
      scope: "openid profile email",
      code_challenge: codeChallenge,
      code_challenge_method: "S256",
      state,
      nonce,
    });

    // Persist the verifier and checks before the browser leaves the application.
    req.session.save((error) => {
      if (error) return next(error);
      res.redirect(authorizationUrl.href);
    });
  } catch (error) {
    next(error);
  }
});
This example stores one pending login per browser session. If the application must support several concurrent login attempts in multiple tabs, store pending transactions by state rather than overwriting a single req.session.oidc object.
Handle the Callback
app.get("/oidc/callback", async (req, res, next) => {
  const pending = req.session.oidc;
  delete req.session.oidc;

  if (!pending) {
    return res.status(400).send("No pending login");
  }

  try {
    // Use the known external callback origin instead of trusting a Host header.
    const currentUrl = new URL(req.originalUrl, redirectUri);

    const tokens = await oidc.authorizationCodeGrant(
      config,
      currentUrl,
      {
        pkceCodeVerifier: pending.codeVerifier,
        expectedState: pending.state,
        expectedNonce: pending.nonce,
        idTokenExpected: true,
      },
    );

    const claims = tokens.claims();
    if (!claims?.sub || !claims.iss) {
      throw new Error("Validated ID token has no issuer or subject");
    }

    // Replace the pre-login session ID to prevent session fixation.
    req.session.regenerate((error) => {
      if (error) return next(error);

      req.session.user = {
        issuer: claims.iss,
        id: claims.sub,
        name: claims.name,
        email: claims.email,
      };

      req.session.save((saveError) => {
        if (saveError) return next(saveError);
        res.redirect("/account");
      });
    });
  } catch (error) {
    next(error);
  }
});
authorizationCodeGrant() processes the callback, sends the back-channel token request, selects the correct signing key by kid, and performs the OIDC checks. The application consumes only the validated claims.
The openid-client API reference documents the discovery, authorization-code, PKCE, nonce, state, and client-authentication helpers used here.
Protect a Route
function requireLogin(req, res, next) {
  if (!req.session.user) {
    return res.redirect("/login");
  }
  next();
}

app.get("/account", requireLogin, (req, res) => {
  res.json({ user: req.session.user });
});

app.listen(3000, () => {
  console.log("Application listening on port 3000");
});
The local account key should be the pair iss + sub. Do not use email as the primary identifier, and do not treat authentication as authorization. Application roles should come from deliberate, validated claims or the application’s own database.
Understanding the ID Token
An ID token is usually a signed JWT with three dot-separated parts:
base64url(header).base64url(payload).base64url(signature)
The payload may resemble:
{
  "iss": "https://auth.example.com",
  "sub": "4f829a18-...",
  "aud": "my-client-id",
  "exp": 1788093600,
  "iat": 1788090000,
  "nonce": "...",
  "name": "Example User",
  "email": "user@example.com"
}
The most important claims are:
| Claim | Meaning |
|---|---|
iss | Who issued the token. It must exactly match the configured issuer. |
sub | The user’s stable subject identifier at that issuer. |
aud | The client or clients for which the token was created. |
exp | The time after which the token is no longer valid. |
iat | The time at which the token was issued. |
nonce | The value that binds the token to this login attempt. |
A JWT is encoded, not encrypted. Anyone who obtains it can usually read its header and payload. Trust comes from validation of its signature and claims, not from the data being hidden.
The ID token is also not a general API credential. It tells this relying party about an authentication event. An access token has a different audience and purpose: authorizing requests to a protected resource. This example needs no external API, so it validates the ID token and then relies on its own application session.
The validation requirements come from the OpenID Connect Core Authorization Code flow, including exact issuer and audience checks.
Logout: Two Sessions, Two Meanings
The application can always destroy its own session:
app.post("/logout", requireLogin, (req, res, next) => {
  req.session.destroy((error) => {
    if (error) return next(error);

    res.clearCookie("app_session", {
      httpOnly: true,
      secure: true,
      sameSite: "lax",
      path: "/",
    });
    res.redirect("/");
  });
});
This logs the user out of the application, but it does not end the Authelia session. If the user starts login again, Authelia may recognize the existing SSO session and return them without asking for credentials.
At the time of this update, Authelia’s support chart lists RP-Initiated Logout as unsupported. Do not invent an end-session URL or call buildEndSessionUrl() unless the discovery document for the deployed provider actually contains end_session_endpoint. Other OIDC providers may support it.
Security Checklist
- Use HTTPS for Authelia, the application, and the callback.
- Register exact redirect URIs; do not use broad wildcard callbacks.
- Generate fresh
state,nonce, and PKCE values for every login. - Keep the raw client secret, PKCE verifier, tokens, and session data on the backend.
- Use
S256PKCE even for a confidential client. - Let an OIDC library perform discovery, JWKS selection, signature verification, and claim validation.
- Regenerate the application session after login and use
HttpOnly,Secure, and an appropriateSameSitecookie policy. - Use a persistent session store in production and define expiry and cleanup.
- Request only the scopes the application needs.
- Never log authorization codes, tokens, secrets, or complete session cookies.
- Treat
iss+subas identity; treat roles and access rules as a separate authorization decision.
The old version of this guide manually constructed endpoint URLs, decoded tokens without always verifying them, and selected a JWKS key by hand. Those mechanics are useful to study, but they are unsafe foundations for copyable application code. Discovery and a maintained OIDC client remove several subtle failure modes while keeping the protocol visible in the surrounding explanation.
Troubleshooting the Flow
| Symptom | Likely cause |
|---|---|
redirect_uri error at Authelia | The URI differs by scheme, hostname, port, path, case, or trailing slash. Compare the configured and requested values exactly. |
invalid_client at the token endpoint | The application has the hash instead of the raw secret, the raw secret is wrong, or client_secret_basic and client_secret_post do not match. |
| “No pending login” on callback | The pre-login session was not saved, its cookie was blocked, or requests are reaching different instances without a shared session store. |
| State, nonce, or PKCE validation fails | The callback belongs to another or expired login attempt, or concurrent attempts overwrote the pending transaction. Start a fresh login. |
| Login loops behind a reverse proxy | The application is not seeing the external HTTPS scheme or the session cookie is not being returned. Check proxy headers and trust proxy scope. |
| Email or name is missing | The scope was not requested, not allowed for the client, or the Authelia user record does not provide the claim. |
| Logout appears to sign in again immediately | The local application session ended, but the Authelia SSO session remains active. |
When debugging, log milestones and error categories, not credentials:
- login route created and saved a transaction;
- browser returned to the exact callback;
- token exchange succeeded or returned a named protocol error;
- ID token validation succeeded;
- local session was regenerated and saved.
That sequence tells you which boundary failed without leaking the values used to cross it.
Further Reading
- Authelia OpenID Connect integration
- Authelia registered-client configuration
- OpenID Connect Core 1.0
openid-clientAPI reference
Buy Me a Coffee